Working with Offline Address Lists
Offline
address lists are not unique address lists. That is, they are not
different address lists than the regular online address lists. Offline
address lists are used to make address lists available to users who are
not connected to the network. The most common scenario in which they are
used is with mobile users who synchronize their mailboxes remotely,
such as over a hotel phone line. These users then disconnect and work
with Outlook offline in order to save toll charges, only reconnecting
when they are done and ready to transmit their e-mail all at once.
Offline address lists allow these types of users to have the benefit of
using address lists when composing e-mail, even though they are not
connected online with the network.
An offline address list
does not necessarily parallel an online address list. That is, it isn’t a
case of simply selecting an address list and checking a box to make it
available offline. Exchange Server 2003 configures a Default Offline
Address List during the installation of the first server in the
organization. By default, the only address list that is made available
offline is the Default Global Address List. Figure 7 shows the properties of the Default Offline Address List.
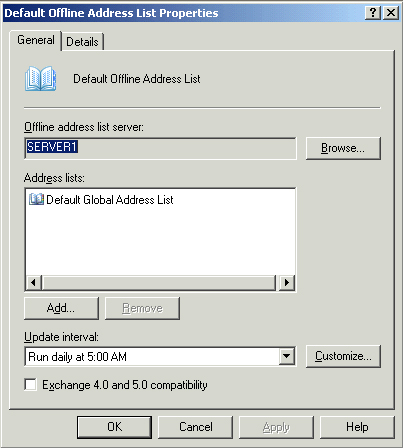
The properties that you can configure include the following:
Offline Address List Server The server that holds the offline address list. You can place it on any Exchange Server 2003 server in the organization.
Address Lists
The address lists that are associated with this offline address list.
You can add or remove address lists by using the Add and Remove buttons.
Update Interval The schedule used by the Recipient Update Service to update address list changes in Active Directory.
Exchange 4.0 and 5.0 Compatibility
Some features of Exchange Server 2003 address lists are compatible only
with Exchange Server 5.5 and later. You can enable compatibility with
earlier versions of Exchange Server by selecting this check box.
Offline address lists are
flexible because they can be configured at the mailbox store level.
Remember that in the properties of a mailbox store, one of the fields is
for the offline address list for the database. Because you can apply
different offline address lists to different mailbox stores, it is
sometimes advantageous to create additional offline address lists to
meet the specific needs of a mailbox store. Creating an offline address
list is similar to creating a regular address list.
1. | Right-click
the Offline Address Lists container, point to New, and then click
Offline Address List. You will be prompted to name the list and choose a
server in the organization to store it.
|
2. | After
selecting the server, click Next. You will need to select address lists
to add to the new offline address list. The Default Global Address List
is included by default, but you can remove it and add other address
lists.
|
3. | Click
Next. Exchange Server 2003 will inform you that the offline address
list will be created during the next maintenance period. Click Next
again, and then click Finish.
|
To apply the new
offline address list to a mailbox store, right-click the desired mailbox
store in Exchange System Manager and then click Properties. Next to the
Offline Address List field, click Browse, and then either type the name
of the offline address list or search Active Directory for it. Once you
click OK to select the offline address list and then click OK again to
apply it, all mailboxes in that mailbox store will use the new offline
address list.
Creating and Applying Recipient Policies
Recipient policies are a
quick and effective way of defining different e-mail addresses for
different users in your organization. For example, Contoso, Ltd.
acquires Fabrikam, Inc., a company that has 5000 employees. Contoso has
migrated Fabrikam’s Exchange Server 2003 organization into Contoso’s
Exchange Server 2003 organization, but Fabrikam needs to maintain its
old e-mail addresses in addition to its new @contoso.com addresses so any e-mail that comes from customers is not returned as undeliverable.
In this situation, it would
be very inefficient to edit the properties of each Fabrikam user and
configure the primary and secondary e-mail addresses. Instead, you could
use a recipient policy to do all the work for you. You would create a
policy that defines @contoso.com as the primary SMTP address and @fabrikam.com
as the secondary SMTP address for all users who have a user attribute
of Company defined with the value Fabrikam. The Recipient Update Service
would then update all users matching the filter with the new e-mail
address configuration.
To create a recipient policy, perform the following steps:
1. | Right-click
the Recipient Policies container underneath the Recipients container in
Exchange System Manager, point to New, and then click Recipient Policy.
|
2. | You
are prompted to choose which property pages to include. You can add or
remove property pages after the policy is created, so for now select
both E-Mail Addresses and Mailbox Manager Settings, and click OK.
Realistically, you would probably want to configure separate recipient
policies if you need to manage both types of properties. As when
configuring other types of policies, while you can consolidate both
types of policies into a single policy, the real power is in the
flexibility of being able to create multiple policies to serve different
needs within an enterprise organization.
|
3. | Next,
you must type a name for your recipient policy. The name should be
something descriptive so you know from the name what function the policy
performs.
|
4. | After
naming the policy, click the E-Mail Addresses (Policy) tab. At this
point, the addresses listed are the same as what is in the Default
Policy. Using the Contoso and Fabrikam example, you would add an SMTP
address of @fabrikam.com and leave it as a secondary address, with @contoso.com being the primary SMTP address.
|
5. | Once
you’ve defined your e-mail addresses, click the General tab and then
click Modify to define the LDAP query. This opens the same Find Exchange
Recipients dialog box that you previously used when creating an address
list. The procedure is the same in filtering the policy membership by
using attributes and values. For example, if you want the policy to
apply to everyone who has the Company attribute for their user account
set to Fabrikam, you specify that on the Advanced tab of this dialog
box.
|
6. | Once
you define the filter, click OK. Exchange Server 2003 will inform you
that if you made changes that cause recipient objects to no longer be
under the control of this policy, their membership may not be
re-evaluated (meaning their addresses may stay the same). Click OK twice
to finish creating the policy. Exchange Server 2003 will prompt you to
confirm that you want to apply the policy to all users that match the
filter. Click Yes to confirm.
|
7. | The
policy will be applied at the next update interval by the Recipient
Update Service, but you can force the immediate updating of user
accounts by right-clicking the recipient policy you created and clicking
Apply This Policy Now.
|
When
you create multiple recipient policies, there is one more configuration
option to set. Recipient policies are applied in the order listed, with
higher policies having a higher priority level than lower policies. You
can right-click a policy and click Move Up or Move Down to increase or
decrease its priority in relation to other policies. The Default Policy
always has the lowest priority, and it cannot be moved up in relation to
other policies.
Practice: Creating and Managing Address Lists and Recipient Policies
In this practice, you
will prepare your Exchange Server 2003 organization’s user accounts and
then create address lists that filter based on user attributes. You
will then create an offline address list, add the address lists you
created to it, and assign it to a mailbox store.
Exercise 1: Prepare the Exchange Server 2003 Environment
Start the Active Directory Users And Computers console. Create the following user accounts with the associated user attributes:
| User | Office | Department | Company |
|---|
| Nicole Caron | Dallas | Sales | Contoso |
| Willis Johnson | Dallas | Marketing | Contoso |
| Jenny Lysaker | St. Louis | Sales | Fabrikam |
| Pete Male | St. Louis | Marketing | Fabrikam |
| Sheela Word | Boston | Sales | Contoso |
| Bob Gage | Boston | Sales | Fabrikam |
| Darin Lockert | Boston | Marketing | Contoso |
| Deb Waldal | Boston | Marketing | Fabrikam |
| Chris Meyer | Omaha | Sales | Contoso |
Exercise 2: Create Address Lists
1. | Start Exchange System Manager. Expand the Recipients container to view the address list containers.
|
2. | Right-click All Address Lists, point to New, and then click Address List.
|
3. | For the Address List Name, type Sales.
|
4. | Click Filter Rules, and then click the Advanced tab.
|
5. | From the Field menu, point to User, and then click Department.
|
6. | Under the Condition field, select Is (Exactly) from the menu.
|
7. | For the value, type Sales. Click Add.
|
8. | Click OK, and then click Finish.
|
9. | Right-click the Sales address list in the All Address Lists container, and then click Properties.
|
10. | Click Preview. Observe that the group membership consists of each user that has a Department attribute of Sales.
|
11. | Repeat
the process to create address lists for Marketing, Dallas, St. Louis,
Boston, Omaha, Contoso, and Fabrikam. Use the Office and Company user
attributes as required to filter the address list based on those values.
|
Exercise 3: Create an Offline Address List
1. | Right-click Offline Address Lists in the Recipients container, point to New, and then click Offline Address List.
|
2. | Type Company Offline for the name, and click Browse to select a server. Choose Server02 to host the offline address list.
|
3. | After
clicking Next, remove the Default Global Address List from the list of
Address Lists. Click Add and add the Contoso and Fabrikam address lists
to the offline address list.
|
4. | Click
Next, and then click Next again when Exchange Server 2003 informs you
that the list will be created during the next maintenance period. Click
Finish to complete creating the offline address list.
|
Exercise 4: Assign an Offline Address List to a Mailbox Store
1. | In Exchange System Manager, navigate to the Support storage group .
|
2. | Right-click the HelpDesk mailbox store in the Support storage group, and then click Properties.
|
3. | Click Browse next to the Offline Address List field.
|
4. | Type Company Offline, and then click Check Names. The name of the address list should become underlined.
|
5. | Click OK, and then click OK again to apply the offline address list to the mailbox store. |